Removing the water filter from under your sink may seem daunting, but with the right approach, it’s a process that you can handle confidently and efficiently. Whether you’re swapping out an old filter for routine maintenance or troubleshooting a system issue, your ability to perform this task will ensure the flow of clean and purified water in your home.
It’s not just about following instructions but also about understanding the importance of clean water and taking charge of your household maintenance. So, grab your tools and take a moment to familiarize yourself with the components under your sink.
Let’s learn how to remove under sink water filter like a pro in 10 steps, ensuring that you and your loved ones continue to enjoy safe, great-tasting water straight from the tap.
How to Remove Under Sink Water Filter: 10 Steps
Step 1: Gathering Tools
Gathering the necessary tools before getting your hands dirty will make removing the water filter easier. Typically, you’ll need an adjustable wrench, a bucket or a towel to catch any drips, and a pair of gloves to protect your hands.

It may also be wise to have some plumber’s tape handy to address any thread issues you might discover upon removal. Ensure all tools are in good working condition and within easy reach to streamline your task.
Step 2: Closing the Water Supply
To prevent any water spillage, shutting off the water supply before attempting to remove the water filter is crucial. Locate the shut-off valve on the cold water supply line under the sink. Turn the valve clockwise until it’s tightly closed. Once the water supply is shut off, turn on the faucet to release any pressure and water left in the line, which also ensures that the system is depressurized before you start disassembling the filter unit.

Step 3: Releasing Pressure
Before physically touching the filter, it’s a good practice to release any built-up pressure that may still be held within the filtration unit. You’ll likely find a pressure release button on the filter assembly. Press and hold this button until you hear air hissing out, indicating that the pressure has been normalized. This will make it safer to unscrew the filter housing and prevent sudden water sprays when opening the system.
Step 4: Draining the Water Storage Tank
If your under-sink water filter system has a storage tank, it’s important to drain it completely before proceeding. Start by locating the tank ball valve, usually attached to the top of the storage tank. Open this valve to allow water to drain out; you can do this by placing a bucket under the tank or attaching a tube that leads into a sink or bucket. Draining the tank prevents any residual water from spilling out when you disconnect the system’s lines and will lighten the tank for easier removal. Be patient, as the draining process may take a few minutes, depending on the size of your tank. Once the water flow stops, close the valve.

Step 5: Disconnecting Any Tubing
Next, focus on the tubing that connects the water filter to your plumbing. Carefully inspect for locking clips or fasteners that secure the tubes. If present, gently remove them before proceeding to disconnect the tubing. Use your hands to push against the collet – a small circular collar around the tube – while pulling the tubing away from the filter housing. This method should disconnect the tubing smoothly; however, if it proves difficult, you may use the adjustable wrench to carefully assist in loosening the connections. Remember to have the bucket or towel in place to catch minor drips or leakage.
Step 6: Removing the Water Storage Tank
After successfully disconnecting the tubing, it’s time to address the water storage tank. If the tank is secured with brackets, you might need a screwdriver to remove any screws attaching it to the cabinet wall. Be cautious as you manipulate the tank; even when emptied, it may still be heavy or awkward. Lift the tank out of the cabinet and set it aside in a safe spot where it won’t be in the way of your workspace or susceptible to damage. Use proper lifting techniques to protect your back if the tank is still somewhat heavy.
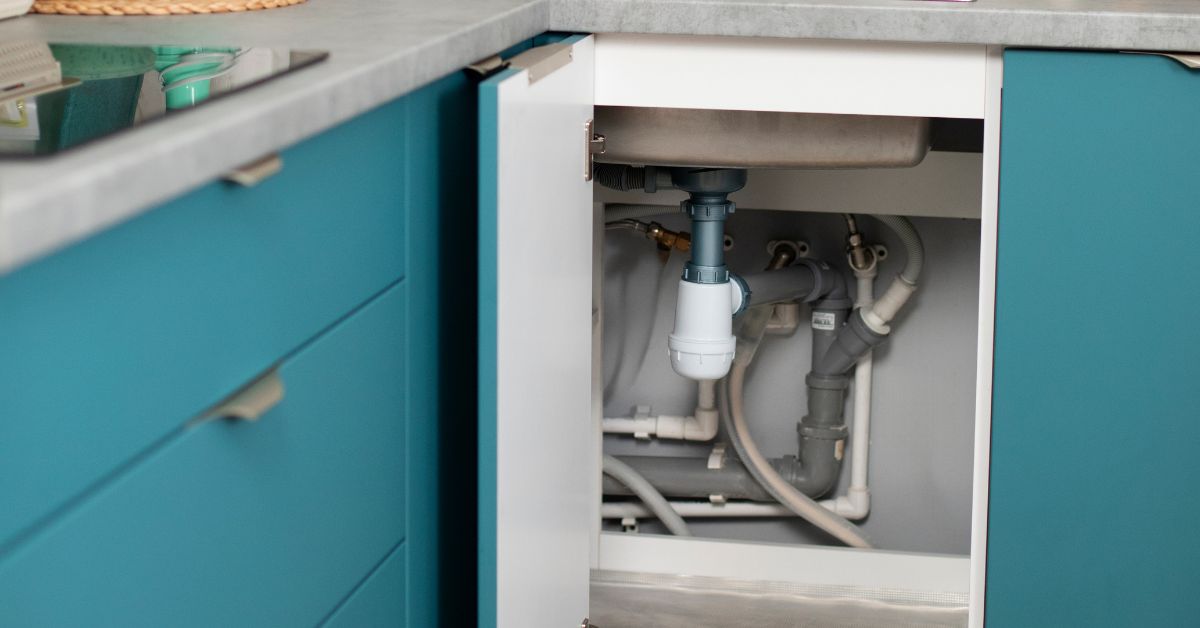
Step 7: Removing the Under Sink Filter
Finally, you can remove the filter housing with the system depressurized and the tank and tubing detached. It may be fastened with brackets similar to the storage tank, requiring a screwdriver to undo the screws. Position the bucket underneath to catch any remaining water, then use your adjustable wrench to twist the housing carefully in a counter-clockwise direction. Be gentle but firm to avoid damaging the threads. Once loosened, unscrew by hand and remove the housing. Your under-sink water filter has been successfully removed, and the space is ready for any maintenance or replacement tasks you plan to undertake.
Step 8: Removing the Filtered Water Dispenser
To complete the removal of your filtration system, it’s necessary to remove the filtered water dispenser, which is the faucet-like component mounted to your sink or countertop where the purified water is dispensed. Begin by clearing the area around the dispenser for easy access. You may need to crawl under the sink to reach the mounting hardware. Using your adjustable wrench, loosen and remove the nut that secures the dispenser to the underside of the sink or countertop. Be mindful of any washers or gaskets as you remove the nut—these will be important for reinstallation or replacement with a new dispenser.
Once the mounting hardware is removed, you can gently pull out the dispenser from above, taking care not to scratch your sink or countertop. If there’s any tubing attached to the dispenser, use the same method as before: press the collet against the fitting and gently pull the tubing out. Place the removed dispenser aside with the rest of the parts. Your complete under-sink water filtration system is now disassembled, leaving your workspace clear for any new installations or modifications needed.
Step 9: Resetting the Plumbing
With the filtration system and dispenser entirely removed, it’s time to reset the plumbing to its original state or prepare to install a new unit. Initially, inspect all the connections and the underside of the sink for any residual water, debris, or damage. Use a towel to dry off any wet spots to prevent water damage and potential mould growth in the cabinet area. If you plan to install a new system, thoroughly review the manufacturer’s installation guide before proceeding.
If you intend to return to a standard sink configuration without a filtration system, reconnect the main water supply to the sink’s faucet. Take the original tubing or a new suitable replacement and connect it to the shut-off valve and the faucet tailpiece. Secure the connections tightly by hand and give an additional quarter turn with an adjustable wrench. However, be careful not to overtighten, as this may damage the threads or the tubing.
Step 10: Opening the Water Supply and Check Leaks
To initiate the final check, slowly turn the main water supply valve in a counter-clockwise direction to open it. Observe for any signs of dripping or leakage at the various connection points. It’s essential to address leaks immediately to prevent water damage under the sink. If you spot a leak, close the valve and examine the connectors to ensure everything is seated correctly and secured tightly. Re-tighten the connections where necessary, being cautious not to apply excessive force that could strip the threads or damage the materials.
Once all connections are leak-free, fully open the water supply valve and check the faucet operation. Verify that the water flow is steady and that there are no fluctuations or interruptions. Let the water run for a minute or two to flush out any air or debris trapped in the pipes.
With these steps completed, you’ve ensured that the sink is functional and safe for post-filter removal.
Conclusion
In conclusion, meticulously removing an under-sink water filtration system is a task that can be accomplished with some essential tools and a careful approach. Whether preparing for maintenance, upgrading to a new system, or simply returning to a standard sink configuration, the above steps will help you safely and effectively achieve your goal. Always follow proper safety protocols and handle all components carefully to avoid any potential damage to your plumbing.
Inspecting your plumbing ensures your sink setup’s long-term success and functionality even after completion. Remember, taking the time to do the job right will yield the best results and provide peace of mind.
Hello, Jack speaking. I’ve bookmarked your site and make it a habit to check in daily. The information is top-notch, and I appreciate your efforts.