Are you tired of dealing with hard water issues in your home, especially in the garage? Installing a water softener in your garage can effectively combat hard water problems and ensure your appliances and plumbing stay in top condition.
In this article, we will walk you through why to install a water softener in the garage, choosing the right water softener for the garage, the material needed for installations, installing a water softener in your garage, and ensuring you can access soft, clean water throughout your household. Let’s dive in to answer your question, “how to install water softener in garage?”
Why Install Water Softener in Garage?
Before we delve into the installation process, let’s explore why installing a water softener in your garage is wise.
1. Purpose
A water softener is a specialized water treatment system designed to address the issue of hard water. Hard water contains high concentrations of minerals, particularly calcium and magnesium ions.
These minerals are picked up as water flows through natural deposits like limestone and chalk, making the water “hard.” The purpose of a water softener is to remove these minerals from the water, replacing them with sodium or potassium ions through a process called ion exchange. The water softener effectively transforms hard water into softened water, making it more suitable for everyday use.
2. Benefits
Reduced Limescale Buildup
One of the primary benefits of a water softener is its ability to prevent limescale buildup in household appliances and plumbing fixtures. Limescale results from mineral deposits left behind when hard water is heated or evaporates. Over time, limescale can accumulate in pipes, water heaters, and appliances like washing machines and dishwashers, reducing efficiency and longevity. Softened water significantly reduces the risk of limescale formation, improving appliance performance and reducing maintenance costs.
Softer Skin and Hair
Softened water is gentle on the skin and hair, as it doesn’t leave behind mineral residue that can dry out and irritate the skin. People with sensitive skin or certain skin conditions may notice improved skin health when using softened water for bathing and washing.
Improved Cleaning Efficiency
Softened water enhances the effectiveness of soaps and detergents when used for household cleaning tasks. Soft water allows soap to lather more efficiently and reduces soap scum, resulting in cleaner dishes, laundry, and surfaces. This saves time and effort and reduces the amount of cleaning products needed.
Extended Appliance Lifespan
By preventing limescale buildup in appliances like water heaters, coffee makers, and washing machines, a water softener helps extend their lifespan. Appliances that operate with softened water are less prone to corrosion and blockages, ensuring they remain efficient and functional for extended periods.
Save Energy and Costs
Hard water can reduce the efficiency of your garage’s water heaters and other appliances, leading to higher energy consumption and increased utility bills. A water softener can enhance the efficiency of your devices, saving you money in the long run.
Eco-Friendly Solution
A water softener reduces the need for harsh cleaning chemicals, as soft water is more effective in cleaning tasks. This eco-friendly approach benefits both your household and the environment.
Choosing the Right Water Softener Unit
Selecting the perfect water softener unit for your home is a critical step in ensuring the effectiveness and efficiency of your water softening system. With a wide array of available options, making an informed decision based on your needs and water quality is essential. In this section, we’ll guide you through the factors to consider when choosing the suitable water softener unit for installation in your garage.
Assess Your Water Hardness
Determining your water’s hardness level is the first step in choosing a water softener. High concentrations of calcium and magnesium minerals characterize hard water. You can get your water hardness tested through a water testing kit or by contacting your local water utility company. Understanding your water’s hardness will help you determine the appropriate size and capacity of the water softener required to handle your household’s water consumption.
Consider Water Usage
Evaluate your household’s daily water consumption to ensure your chosen water softener can handle the demand. Larger households with higher water usage may require a higher capacity water softener to maintain an adequate supply of softened water.
Regeneration Process
Water softeners regenerate by flushing out the accumulated minerals from their resin tank.
There are two primary types of regeneration processes: timer-based and demand-initiated regeneration (DIR).
Timer-based systems regenerate at preset intervals, regardless of water usage, which may lead to wastage.
On the other hand, DIR systems regenerate based on actual water consumption, making them more efficient and cost-effective. Consider opting for a DIR system for enhanced water and salt efficiency.
Space Availability
Examine the space available in your garage for installing the water softener unit. Water softeners come in various sizes and configurations, so ensure you choose one that fits comfortably within your garage’s designated area. Consider both the height and width of the unit, leaving enough space for any necessary maintenance and connections.
Salt-Based vs. Salt-Free Systems
Traditional salt-based water softeners use ion exchange to remove minerals from water, producing softened water. Alternatively, salt-free systems use a different technology called template-assisted crystallization (TAC) to neutralize minerals without removing them. While salt-based systems offer efficient softening, salt-free systems require less maintenance and do not add sodium to the water. Select the type that aligns with your preferences and any potential health considerations.
Certification and Warranties
Choose a water softener certified by recognized organizations, such as NSF International, to ensure it meets quality and performance standards. Additionally, check the manufacturer’s warranty to protect your investment and provide peace of mind.
Budget Considerations
Set a budget for your water softener purchase and installation. Consider the unit’s initial cost, ongoing maintenance expenses, and the price of salt or other regeneration materials. While opting for the cheapest option is tempting, remember that investing in a reliable and efficient water softener can save you money in the long run by reducing energy consumption and preventing appliance damage.

Choosing the suitable water softener unit for your garage installation is essential to achieving the desired water quality for your household needs. Evaluate your water hardness, consider water usage, regeneration process, space availability, and the type of system that best suits your preferences and budget. With this knowledge, you can confidently install a water softener that will transform your home water into a softened delight, providing long-term benefits.
Materials Needed for Installation
To successfully install a water softener in your garage, you’ll need a specific set of materials to ensure a seamless setup. Gathering all the necessary components beforehand can streamline the installation process and avoid unnecessary delays. This section provides a comprehensive list of materials required for a water softener installation in your garage.
Water Softener Unit
The heart of the water softening system, the water softener unit itself, is the primary component needed for the installation. Choose a model that matches your water hardness level and household water consumption.
Resin Tank
The resin tank holds the ion exchange resin, which removes minerals from the water. It’s an essential part of the water softener system.
Brine Tank
The brine tank stores the salt used in the regeneration process to clean the resin tank. It’s an integral part of salt-based water softeners.

High-Quality Water Softener Resin
Select a reliable and high-quality water softener resin. The effectiveness of your water softener largely depends on the quality of the resin you use.
3/4″ Bypass Valve
Install a 3/4″ bypass valve to enable you to shut off the water softener when required without affecting the water supply to your home.
Copper or PEX Tubing
To attach the water softener to your home’s water supply lines, you will require 3/4″ copper or PEX tubing.
Pipe Insulation
Insulate the copper or PEX tubing to prevent heat loss and protect against condensation.
Compression Fittings
Use compression fittings to securely connect the water softener unit, resin tank, and brine tank.
PVC Glue and Primer (If Using PVC Piping)
If installing PVC piping, have PVC glue and primer on hand to ensure watertight connections.
Plumbing Tools
Standard plumbing tools like a pipe cutter, wrench, and tape measure will be necessary for accurate cuts and connections.
Bucket and Hose
Have a bucket and hose available for flushing and testing the water softener during installation.
Drain Tubing
Drain tubing will direct wastewater from the brine tank during regeneration.
It’s crucial to check the manufacturer’s instructions for your specific water softener model to ensure you have all the required materials. Some water softeners may come with installation kits with specific components, while others may require you to purchase them separately.
Having all the necessary materials ready before starting the installation, you can tackle the project efficiently and confidently. With the right tools and components, you’ll be well on your way to enjoying the benefits of softened water in your home.
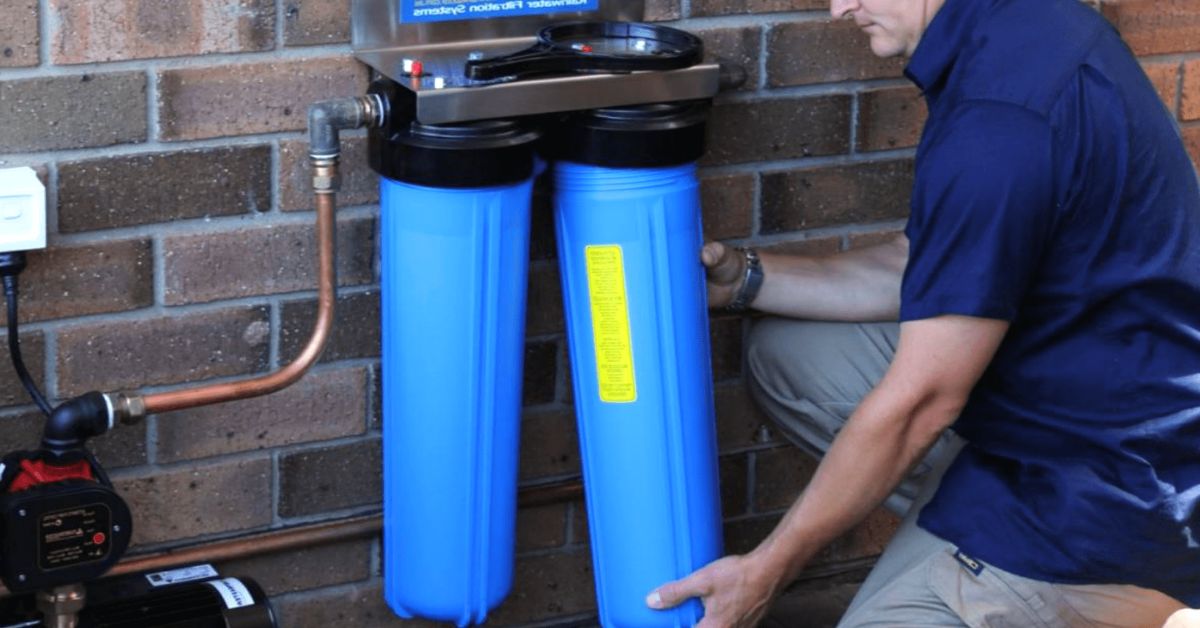
Step-by-Step Guide: How to Install Water Softener in Garage?
Let’s walk you through the installation process step-by-step to ensure a successful setup.
Preparation and Planning
1. Selecting the Right Location
Choose a suitable location in your garage for the water softener. Ensure it is near the main water supply line and a drain for discharging the wastewater during the regeneration process.
2. Shut Off Water Supply
Before installing, turn off the main water supply to avoid any potential accidents.
Installing the Water Softener
3. Unpack and Inspect the Water Softener
Carefully unpack the water softener and inspect it for any shipping damages. Follow the manufacturer’s guidelines during this process.
4. Assemble the Installation Kit
Assemble the installation kit according to the instructions provided by the manufacturer. This kit typically includes connectors, a bypass valve, and necessary tubing.
5. Connect the Bypass Valve
Attach the bypass valve to the water softener head. The bypass valve allows you to control water flow to the softener during maintenance or repairs.
6. Install the Brine Tank
Place the brine tank near the water softener and connect it to the provided tubing.
7. Connect the Inlet and Outlet
Attach the inlet and outlet fittings to the water softener head, ensuring a secure connection.
8. Connect the Drain Line
Connect the drain line from the water softener to the nearest drain or a designated drainage area in your garage.
9. Connect to the Main Water Supply
Carefully cut the main water supply line using a pipe cutter and attach the water softener using the provided connectors.
10. Check for Leaks
Once the connections are made, turn on the main water supply and check for leaks. Make necessary adjustments if required.
11. Add Salt to the Brine Tank
Add water softener salt to the brine tank per the manufacturer’s instructions.
12. Program the Water Softener
Follow the user manual to program the water softener settings based on your water hardness level and household needs.
Conclusion
Installing a water softener in your garage can significantly improve your water quality and protect your appliances and plumbing from the damaging effects of hard water. Following the step-by-step guide and the helpful tips in this article, you can confidently set up a water softener system and enjoy the benefits of soft, clean water throughout your household.
Remember, while DIY installation is possible, seeking professional assistance can ensure a seamless setup and trouble-free operation in the long run. Say goodbye to hard water issues and embrace the advantages of a water softener for a more efficient and eco-friendly lifestyle.
Hopefully, you find the answer to the question, “How to install water softener in garage?”
FAQs
How frequently does the water softener need salt added?
The frequency of adding salt to the water softener depends on your water usage and the capacity of the brine tank. Generally, it’s recommended to check the salt level at least once a month and add more as needed.
Can I install the water softener outdoors?
Water softeners are designed for indoor use, preferably in a temperature-controlled environment. Installing a water softener outdoors exposes it to extreme weather conditions, potentially causing damage and reducing its lifespan.
Do water softeners remove essential minerals from the water?
Water softeners remove hardness minerals like calcium and magnesium but do not remove essential minerals that are beneficial for health. Softened water remains safe for drinking and cooking.
How do I know if my water softener is functioning correctly?
Check for signs of improved water quality, such as reduced limescale deposits and softer skin and hair. Additionally, monitor the water softener’s regeneration cycle and ensure it’s regenerating as programmed.
Is it normal to find some residual salt in the softened water?
Finding a minimal amount of residual salt in softened water is expected. This small concentration is safe for consumption and poses no health risks.